First of all, do you really know what is Word?
Microsoft Word is one of the Office suites of program. Normally you can use this program to do your document that contains text or graphic, such as letter, company memo, flyer, etc.
If you are new to Office Word 2007, this page going to guide you from the very basic to more in-depth topic and features related to Word 2007.
As usual, the most common way to start Word 2007 is from the Start menu displayed when you click the Start button at the left end of the Microsoft Windows taskbar.
To start Microsoft Word 2007 from the Start Menu
- Click on the Start button, point to All Programs then click on Microsoft Office and click on Microsoft Office Word 2007 again

- The first screen that you will see a new blank page document. You may notices that the look of the program window has changed radically from previous versions.
- When you click the Office Button, Commands related to managing Word and Word documents are gathered together on this menu.

- The Title bar displays the name of the active document. At the right end of the title bar are the three familiar buttons - Minimize, Restore and Close buttons.
- Below the title bar is the Ribbon, which makes all the capabilities of Word available in a single area so that you can work efficiently with the program. You can find more descriptions about the Word 2007 ribbon.
- Across the bottom of the program window, the Status bar gives you information about the current document.
- At the right end of the status bar is the View toolbar, which provides tools for adjusting the view of document content.

The Word 2007 window has many features to aid you in creating and editing documents. Following are the description of some important elements:
- Office button: Opens the Office menu, from which you can open, save, print, and start new presentations.
- Quick Access Toolbar: A small toolbar next to the Office button contains shortcuts for some of the most common commands.
- Title bar: Identifies the Word program running and the name of the active presentation.
- Minimize button: Shrinks the application window to a bar on the taskbar; you click its button on the taskbar to reopen it.
- Maximize/Restore button: If the window is maximized (full screen), click will changes it to windowed (not full screen) and vice versa.
- Close (Quit) button: Closes the application.
- Ribbon: Functions as a combination of menu bar and toolbar, offering tabbed "pages" of buttons, lists, and commands.
- View buttons: Allow you to see the active Word window/page in different views.
- Status bar: Reports information about the presentation and provides shortcuts for changing the view and the zoom.
The ribbon is divided into eight tabs by default, and each tab is a selection of groups that show related items together. Command buttons in each group carry out a command or display a menu of commands.
As you can see, similar commands are grouped together making the ribbon very task oriented. The more popular commands are available directly on each tab; you can directly access the command by clicking on the command icons/buttons.

Here are the elements in a Word 2007 ribbon:
- Ribbon: The whole bar, including all of the tabs.
- Tab: A tabbed page of the Ribbon such as Home, Insert, etc. Every tab contains several groups and every group has it own command icons.
- Group: A section of a tab. For example, the Home tab has the following groups: Clipboard, Font, Paragraph, Styles, and Editing.
- Dialog box launcher: A small icon in the bottom-right corner of a group, from which you can open a dialog box related to that group.
To minimize the Ribbon
- Click Customize Quick Access Toolbar
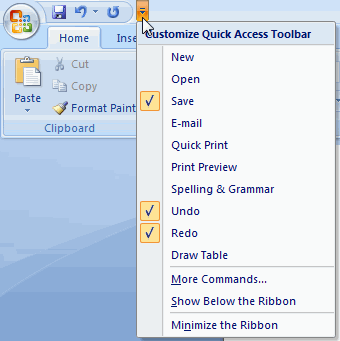
- From the drop-down menu, click Minimize the Ribbon.
- To use the Ribbon while it is minimized, click the tab you want to use, and then click the option or command you want to use.
To restore the minimized Ribbon
- Click Customize Quick Access Toolbar.
- From the drop-down menu, click the Minimize the Ribbon again.
Note: To quickly minimize the Ribbon, double-click the name of the active tab. Double-click a tab again to restore the Ribbon.
Keyboard shortcut: To minimize or restore the Ribbon, press Ctrl + F1
SAVE AND SAVE AS
The first time you save a document, whether you click on Office Button - Save OR Office Button - Save As, you will bring to a Save As dialog box.
From this dialog box, you have to specify where you want to save it - that is, the disk drive and the folder or subfolder in which you want it saved as well as the file name.
Subsequently, if you save the file you just need to go to Office Button - Save and the file will be save. If you wish to save the same file to other location or give a new file name, then you need to use the Office Button - Save As command.
To save a document for the first time
- From the Office Button, click Save As.

- From the Save As dialog box displayed, click the icon on the left (under the Favorite Links section) and browse to the location that you want the file to be saved.
- If you want to save your new document in a folder that already exists in the major area, double-click that folder to open it.
- If you want to store your new document in a new folder, click the New Folder icon in the toolbar, type the name of the new folder, and click OK. The new folder will open.
- When you have the folder(s) open in which you want to save the document, enter the name of the document in the File name: box, and then click Save button.
To save a document subsequently
- From the Office Button, click Save.
- Click the Save icon on the Quick Access Toolbar.
- Press CTRL+S.
OR
OR
To save a document automatically
- From the Office Button, click Word Options.
- From the Word Options dialog box displayed, and click the Save option on the left.

- Under the Save documents section, click the Save AutoRecover infomation every check box.
- In the minutes box, use the arrows to select a time or type a time for how often Word is to save your document.
- Click OK to close the dialog box.
Drop caps can be used to add style to a document and draw attention to something in the document. Maybe you are not aware that you seems the drop cap before, just you don't know that it's a drop cap. There are basically two styles of drop caps, dropped and in margin. Here it looks like.
To add a drop caps to your document

- Type your paragraph as you normally would.
- Select the first character of the first word at the start of your paragraph.
- Click the Insert tab of the Ribbon.
- In the Text group, click Drop Cap then click on Drop Cap Options.

- From the Drop Cap dialog box displayed, in the Position section, you can choose either Dropped or In margin option.

- Change any other options to format your drop cap.
- Click on OK.
What if you want to draw attention to an entire paragraph? One option is to shade the entire paragraph in a different color, making it stand out from the rest.
This shading can be added in conjunction with any border you may specify for the paragraph. Word 2007 even can allows you to precisely control the degree of shading.
To add shading to a paragraph
- Position the insertion point in the paragraph that you want to shade.
- Click the Home tab from the Ribbon.
- In the Paragraph group, click the down-arrow to the right of the Shading tool.

- From the shading color palette displayed, select any one of the theme colors of the palette. There are ten colors, and each option under the colors represents a different percentage of shading for that color.
To remove shading from a paragraph
- Position the insertion point in the paragraph with shading applied.
- Click the Home tab from the Ribbon.
- In the Paragraph group, click the down-arrow to the right of the Shading tool.
- From the shading color palette displayed, select No Color. Then, the paragraph shading will be removed.
Borders are added above, below, or to either side of any amount of text, from a single character to several pages.
You can add many varieties of shading to the space occupied by selected text, paragraphs, and pages - with or without a border around them. You can create horizontal lines as you type.
The following will show you how to add Word 2007 borders and shading to the selected text and the unique way to create horizontal lines as you type.
To add Word 2007 borders and shading to text
- Select the text for which you want to have a border or shading.
- From the Home tab, in the Paragraph group, click the Borders down arrow, and then select the type of border you want to apply.

To add paragraph borders
- Place the mouse cursor on the paragraph that you wish to add the borders.
- From the Home tab, in the Paragraph group, click the Borders down arrow, and then select Borders and Shading.

- From the Borders and Shading dialog box displayed, click the Borders tab.
- Do the changes by selecting the type of box (click Custom for less than four sides), the line style, color, and width you want.
- If you want less than four sides and are working with paragraphs, click the sides you want in the Preview area.
- Click the Options button to set the distance the border is away from the text.

- From the Border and Shading Options dialog box displayed, set the distance for top, bottom, left and right.
- Click OK to close the Border and Shading Options dialog box.
- Click OK.
To add page borders
- From the Home tab, in the Paragraph group, click the Borders down arrow, and then select Borders and Shading.
- From the Borders and Shading dialog box displayed, click the Page Border tab.
- Do the changes by selecting the type of box (click Custom for less than four sides), the line style, color, width and art that you like to use for the border.
- If you want less than four sides, click the sides you want in the Preview area.
- Click the Options button to set the distance the border is away from either the edge of the page or the text.

- From the Border and Shading Options dialog box displayed, set the distance for top, bottom, left and right.
- Click OK to close the Border and Shading Options dialog box.
- Click OK.
To add shading
- Select (highlight) the text for which you want to have shading.
- From the Home tab, in the Paragraph group, click the Borders down arrow, and then select Borders and Shading.
- From the Borders and Shading dialog box displayed, click the Shading tab.

- You can select a color of shading. If desired, select a pattern, and choose whether to apply it to the entire page, paragraph, or just to the selected text.
To create horizontal lines as you type
- Press ENTER to create a new paragraph.
- Type --- (three hyphens) and press ENTER. A single, light horizontal line will be created between the left and right margins.
- Type = = = (three equal signs) and press ENTER. A double horizontal line will be created between the left and right margins.
- Type _ _ _ (three underscores) and press ENTER. A single, heavy horizontal line will be created between the left and right margins. As you can see, adding Word 2007 borders and shading features to your documents really can enhance the readability of the text.
- PAGE BREAK
- prevent a page break in the middle of a paragraph
- prevent a page break between paragraphs
- specify a page break before a paragraph
There are a two ways of inserting page breaks into your Microsoft Word 2007 documents:
To insert a page break
- Click where you want to start a new page.
- On the Insert tab, in the Pages group, click Page Break.

To prevent page breaks between paragraphs
- Select the paragraphs that you want to keep together on a single page.
- On the Page Layout tab, click the Paragraph Dialog Box Launcher, and then click the Line and Page Breaks tab.

- Under the Pagination section, select the Keep with next check box.
- Click OK.
- Then, apply the page break.
- Select the paragraph that you want to prevent from breaking onto two pages.
- On the Page Layout tab, click the Paragraph Dialog Box Launcher, and then click the Line and Page Breaks tab.
- Under the Pagination section, select the Keep lines together check box.
- Click OK.
- Then, apply the page break.
To specify a page break before a paragraph
- Click the paragraph that you want to follow the page break.
- On the Page Layout tab, click the Paragraph Dialog Box Launcher, and then click the Line and Page Breaks tab.
- Under the Pagination section, select the Page break before check box.
- Click OK.
- Then, apply the page break.
Templates are used to create new document or to change the look of existing ones.
Word 2007 comes with several installed templates that you can use to create letters, faxes, memos, and more. You can get more templates from the Microsoft website or you can create your own templates.
To create a template
- With Word open, click the Office Button, and click New. The New Document dialog box displayed.

- Under Templates, click Blank and recent to display a blank document template and the templates that you most recently used. Click the Blank document thumbnail.
- Click Create button. A new document opens.
- Build the template by adding needed text, formatting, and other stuff.
- Save the template by choosing the Office Button, then Save As command and click the Word Template.
- From the Save As dialog box displayed, type a name for the template.
- Click the Save button. Close the template.
To modify the created Word 2007 template
- Open the existing template that you already created.
- Make your changes to the template file.
- Use the Save As command to either overwrite the existing template or save the document as a new template.
To use the preinstalled template
- Click the Office Button, click New.
- From the New Document dialog box displayed, click Installed Templates under the Templates section.

- Use the scroll bar to scroll through and select a suitable template, click the Create button.
To attach a Word 2007 template to a document
- Open the document that needs a new template attached.
- From the Office Button, click the Word Options button.
- From the Word Options dialog box displayed, click Add-Ins from the left side of the dialog box.
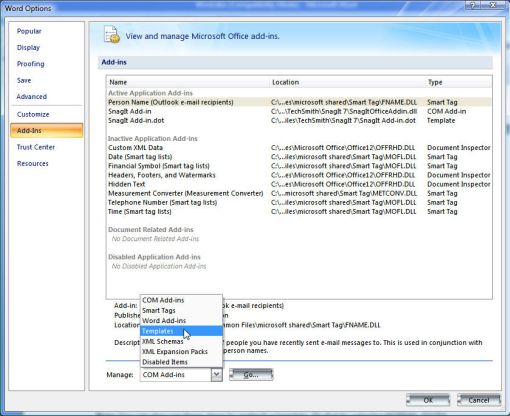
- On the right side of the dialog box, near the bottom, choose Templates from the Manage: drop-down list.
- Click the Go button.

- From the Templates and Add-ins dialog box displayed, you should see which template is currently attached to the document, such as Normal.
- Click the Attach button.
- From the Attach Template dialog box displayed, select the template you want to attach and click the Open button. The template is now attached.
- Optionally, if you check the Automatically update document styles option, your current styles are changed to reflect those of the new template.
- Click OK.
INSERTING TABLES
There are three ways to insert a table in Word 2007 document:
1) Clicking the Table button creates a table with the number of columns and rows you select from the grid, with all the cells of equal size.
2) You can use the Insert Table dialog box, where you can specify the number of rows and columns as well as their sizes.
3) You can also create a table by drawing cells the size you want.
When table was created, you can then enter text, numbers, and graphics into the table's cells, which are the boxes at the intersections of a row and a column.
To Insert a Table (method 1)
- Click the Insert tab of the Ribbon.
- In the Table group, click the Table icon. Word displays a drop-down list.
- Drag the intended table columns and rows from the table grid. For example, 5 X 5 tables. The table will automatically insert into the document.

To Insert a Table (method 2)
- Click the Insert tab of the Ribbon.
- In the Table group, click the Table icon.
- From the drop-down list displayed, click the Insert Table command.

- From the Insert Table dialog box displayed, in the Table size section, specify the Number of columns and Number of rows of the table.
- Click OK.
To Draw a Table
- Click the Insert tab of the Ribbon.
- In the Table group, click the Table icon. Word displays a drop-down list.

- Click on Draw Table from the list of options. Word changes to Print Layout view (if you are not already in that view) and changes the mouse pointer so it looks like a pencil.
- Use the mouse pointer to define the outside borders of your table, much as you would draw in a drawing program.
- Use the pencil to draw the columns and rows into the table.
- Press Esc when you are done.
Well, after you create a table, you can type text or numbers into cells and press the Tab key to move the insertion point from cell to cell. Pressing Tab when the insertion point is in the last cell in the last row adds a new row to the bottom of the table.
In addition to the Tab key, you can use the Arrow keys (up, down, left and right) to position the insertion point, or you can simply click any cell.
If you know how to create/draw a table, you also must know how to delete a table, or even delete a table columns or rows. Actually there is various ways to delete column/row of a table, but here we show you one of the easiest ways to perform that.
To delete a column in a table
- Move your mouse pointer to the top of the table column that you wish to delete until you see a small arrow pointing downward and click once. The entire column is highlighted.
- Right-click on the highlighted column and click on Delete Columns.

To delete a row in a table
- Move your mouse pointer to the left of the table row that you wish to delete until you see an arrow pointing inward and click once. The entire row is highlighted.
- Right-click on the highlighted row and click on Delete Rows.

- Highlight the entire table that you wish to delete.
- On the Table Tools Layout tab, in the Rows & Columns group, click on Delete icon and click the Delete Table option.

INSERT PICTURE
The Word 2007 picture tool enables you to place the picture that you like in the document. The picture can be the existing in your computer, from the digital camera that you snap, or download online.
Once the picture inserted in your document, it can be manipulated in a number of ways such as resize it, and move them into the exact positions that you want, wrap a picture with text, and so on.
This tutorial will guide you on how to insert a picture to your document and some basic manipulations.
To add a picture to your Word 2007 document
- Place your insertion point in the document where you want to place the picture.
- From the Insert tab, in the Illustrations group, click the Picture icon.

- From the Insert Picture dialog box displayed, browse to the location where the picture you want to insert, and select it.
- Click Insert button. The picture is inserted in the document.
- From the Picture Tools Format tab, you can adjust custom settings, such as adjusting brightness and contrast or choosing to display the image with various borders and effects.
Note: If the Picture Tools Format tab is not showing, click the picture to select it.
Once you have added the picture, you can remove areas from a picture that you do not want by using the Crop tool. The following steps show you how to do it.
To crop a Word 2007 picture
- Open and select the picture you want to crop.
- From the Picture Tools Format tab, in the Size group, click the Crop icon.
- The picture redisplays with eight sizing handles on the corners and sides, and the mouse pointer becomes a cropping icon when outside the picture.
- Place the mouse over one of the eight sizing handles, and drag the tool so that the area of the picture is cut away (cropped).
- Press Esc or click outside of the image to turn off the Crop tool. Note: If the Picture Tools Format tab is not showing, click the picture to select it.
To change a Word 2007 picture file size
- Open and select the pictures whose file size you want to reduce.
- From the Picture Tools Format tab, in the Adjust group, click the Compress Pictures icon.

- From the Compress Pictures dialog box displayed, under the Apply to section, choose Selected pictures if that is what you want (versus applying it to all the pictures in the document).
- Under the Change resolution section, choose whether the target output should be printing the document, viewing it on the web/screen, or no change. The resolution of the resulting image is shown in dots per inch (dpi). The greater the dpi, the higher the resolution.
- Under the Options section, choose whether to compress pictures and/ or whether to delete cropped areas of pictures.
- Once finish, click OK to close the Compress Pictures dialog box.
To wrap a Word 2007 picture with text
- Place a picture in a document, and drag a picture to any location on a page even if other content shifts on the page.
- Click the picture to select it.
- From the Picture Tools Format tab, in the Arrange group, click the Position icon.

- Under the With Text Wrapping section, choose and click on any wrapping style, except In Line With Text.
- The picture is reposition to the selected location. You can now freely drag the picture to anywhere in the document.
Word 2007 provides easy access to all the commands necessary for creating a mail merge. These commands are available in the Mailings tab on the Ribbon. You can merge a mailing list to letters, e-mail messages, envelopes, and labels.
The following will show you the overall process of creating mail merge in Microsoft Word 2007.
Step 1: Accessing Word 2007 Mail Merge commands
- Open a blank Word 2007 document.
- From the Mailings tab, in the Start Mail Merge group, click on Start Mail Merge icon and from the menu appear, select the desired options to create your mail merge.

Step 2: Choosing a Document Type
- Your options for selecting a document type include the following: - Letters: allows you to alter one letter and sent it to multiple people (assume we select this option for demonstration purpose).
- E-mail Messages: allows you to personalize letters designed to be sent to multiple people via e-mail. For instructions on how to perform this type of merge, refer to Creating Mail Merge Email.
- Envelopes: allows you to print envelopes addressed to multiple people. For instructions on how to perform this type of merge, refer to Creating Mail Merge Envelopes.
- Labels: allows you to print labels addressed to multiple people. For instructions on how to perform this type of merge, refer to Creating Mail Merge Labels.
- Directory: allows you to gather varied but related information into a list such as a collection of lists regarding department directory, can includes list names, phone numbers, etc.
Step 3: Choosing the Recipients
- From the Mailings tab, in the Start Mail Merge group, click on Start Mail Merge icon and from the menu appear, select the desired options to select recipients:

- Use Existing List: When you've been through this before or you have handy a database list you want to use, this option makes the most sense. After choosing the list from the Select Data Source dialog box, where you can choose the file you want to use. For more information, please refer another article on Mail Merge Recipients.
- Select from Outlook Contacts: Uses your existing Outlook contacts as recipients. Unless your PC is on a network with the proper kind of Microsoft Server software installed, you can forget this option.
Step 4: Write and Insert Fields
- Place the insertion pointer where you want a field to appear.
- From the Mailings tab, in the Write & Insert Fields group, click the desired options to add text and variable information to your document. Frequently used options include: - Address Block: to specify the format of your recipients' names, whether to insert the company name and postal address, and the format of the postal address.
- Greeting Line: to format how the greeting line will appear (e.g., Dear Mr. Randall,) and choose which format to use for unknown names (e.g., Dear Sir or Madam,).
- Insert Merge Field: to insert fields for a variety of common options (such as the first or last name, phone number, or state of each recipient).
Step 5: Previewing Your Documents
The Mail Merge task pane presents you with an opportunity to review what the merged document will look like. This way, you can go back and make any last-minute changes to fine-tune your merge.
- From the Mailings tab, in the Preview Results group, click the Preview Results icon.
- You can browse through the documents for the other entries by clicking the Previous or Next button.
Step 6: Completing a Word 2007 Mail Merge
The last step to complete the merge is to accept the preview of how the merge will look and direct Word to perform the merge. You can print the merged documents or, prior to printing, you can edit individual documents.
No comments:
Post a Comment